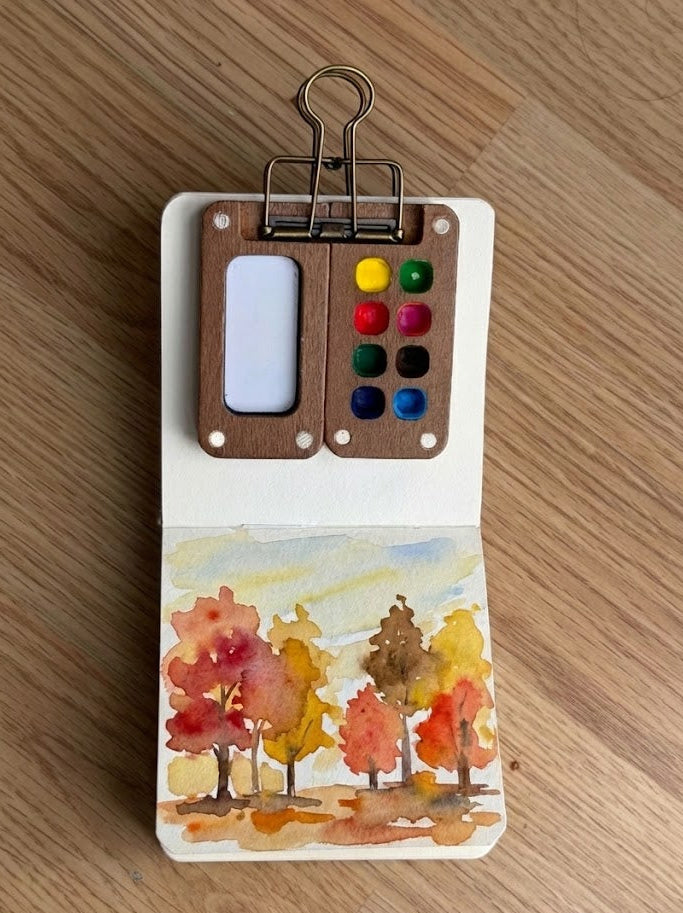
가을 수채화: 단계별 튜토리얼

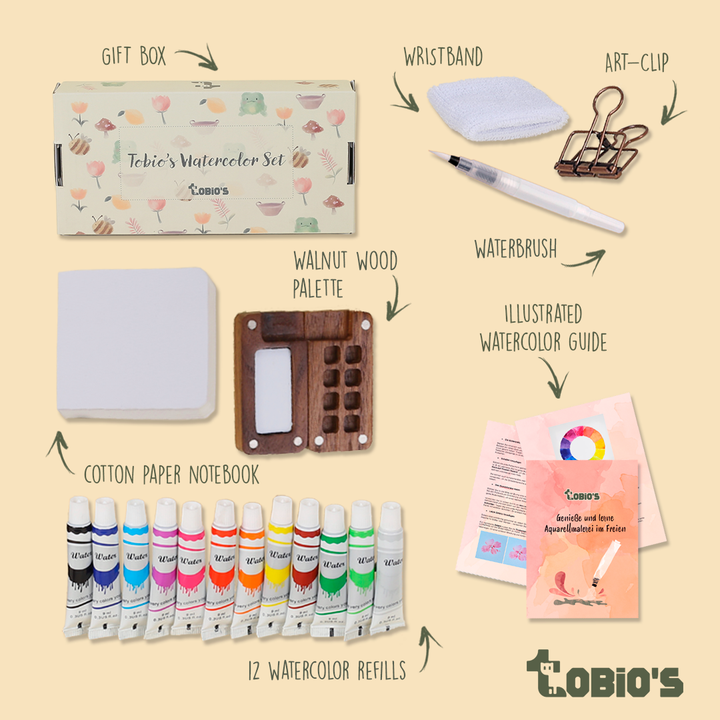
What You'll Need
- 종이
- 연필과 지우개
- 물컵 2개
- 수채화 물감
- 라운드 브러시
Color Palette

"지저분한" 하늘 워시

부드러운 수평선

전경과 길

나무 (웻 온 드라이)
"반짝이" 디테일
영감: 이 스타일이 효과적인 이유
자연 일기와 공원 스케치북:
집중된 스튜디오 세팅이나 몇 시간의 시간 없이, 공원 벤치에 앉아 변화하는 계절의 덧없는 색상을 포착하세요. 참나무의 모든 잎을 그릴 필요가 없습니다; 따뜻하고 상징적인 오커와 시에나 대비와 페이지에 청명한 가을 공기를 불어넣는 느슨한 손만 있으면 됩니다.
계절적이고 아늑한 벽면 장식:
가을 풍경은 자연적으로 따뜻하고 매력적이기 때문에, 부드럽고 느슨한 스터디는 복도나 벽난로 위에 놓으면 믿을 수 없을 만큼 세련되어 보입니다. 이처럼 생동감 넘치는 15분 작품을 액자에 담으면, 딱딱하고 "매장에서 산" 느낌이 아닌, 유기적이고 바스락거리는 움직임이 가득한 즉석 계절 벽면 예술이 됩니다.
Questions, answered
My sky bled into the trees, did I ruin the painting?
No. We want that. In a loose fall watercolor painting, connected shapes create atmosphere. If every edge is perfect, it looks like a sticker book. Embrace the bleed; it looks like mist.
How do I stop my colors from turning into brown mud?
Stop mixing on your palette. Since we are using earth tones (Yellow Ochre and Burnt Sienna), they get dull if over-blended. Drop them wet-into-wet directly on the paper and let them mix there to keep the glow.
Why does my painting look flat halfway through?
You are missing the darks. A watercolor often looks messy until the final step. The "glow" only pops once you add the deep Burnt Umber tree trunks (Step 4) to create contrast against the light sky. Trust the process.
Conclusion
15분
Mel, Founder
More 15-minute tutorials