


How to Paint a Watercolor Sunset, Step by Step


What You'll Need
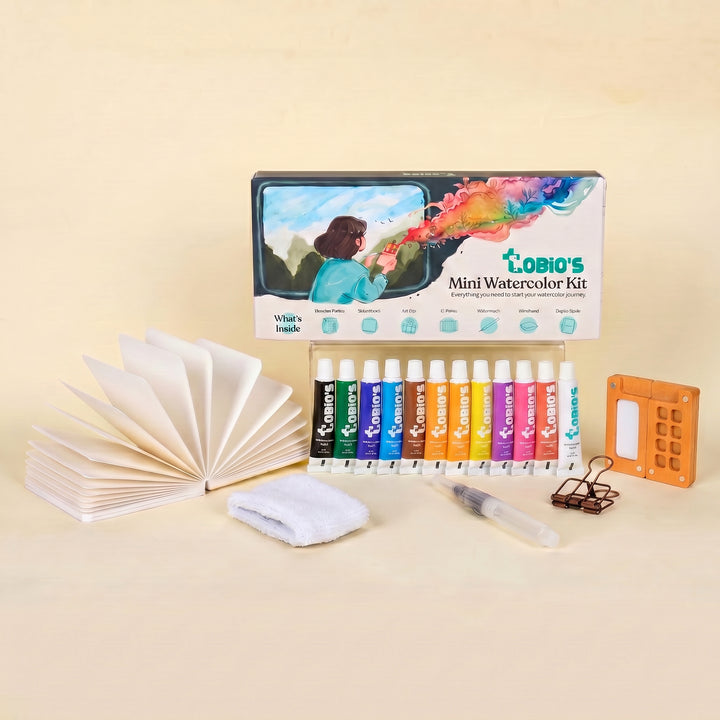
- Watercolor Kit: walnut palette, 12 paint tubes, cotton paper and water brush ($34)
- A larger brush for skies — optional (artist brush set, $21.99)
- Watercolor paper rated at least 140 lb / 300 gsm
I still remember the first time I ever painted a sunset. I had zero clue where to start, and I ended up staring at the page a full ten minutes before making my first stroke. To be fair, it was more of a yellow blob, and it bled everywhere — more of a pancake than a sun. But I loved the feeling. It was the most fun I’d had in a long time.
Sunsets are an amazing starting point for beginners. You don’t have to worry about getting the perspective right, and even the little “mistakes” tend to look pretty decent — real skies are terrible at following the rules too. So get cozy, grab your painting set, and paint a sunset. I promise you’ll love it.
What you’ll need
You’ll need a few things before you get started: a palette, paints, paper, and a brush or two (one with a built-in water reservoir, or a separate water cup). Here’s what I reach for:
- Watercolor Kit ($34): the walnut palette, the 12 paint tubes, the cotton paper, and a water brush — all you need to get started. When you run low on color, the 12 paint refills ($10.99) keep you going.
- A bigger brush (nice-to-have): the brush in the set is absolutely fine, but I love switching it up for skies with the artist brush set ($21.99).
- Paper rated at least 140 lb (300 gsm): wet-on-wet skies put down a lot of water fast, and thinner paper will buckle under it.

Sketch the horizon
This is where I always start, and it’s the easiest part. Grab a pencil and lightly mark the line where the water (or land) meets the sky. This is the only drawing in the whole painting — everything after this is just color.

Wet the sky
Now let’s start painting. If you’re using a water brush, squeeze it so the bristles get wet and stroke it across the paper. If you’re using a regular brush and a water cup, dip the brush in water and wet the paper that way.
The beauty of starting on wet paper instead of dry is that the colors blend and bloom into each other, so the result looks more natural, more organic, and a lot less stripey.

Drop in warm color, lightest at the horizon
Don’t wait for the paper to dry! While it’s still wet, swirl your brush in a light, warm color and start at the horizon. When the sun sets, the sky goes a little peachy, so any pink, yellow, or orange is a great choice — in Tobio’s kit, Lemon Yellow is beautiful here. Let it bleed upward.
Add a slightly warmer color right above it, like Sunset Orange, and let the two blend where they meet. Above that, go warmer and more intense — Poppy Bloom or Electric Rose, or any color that speaks to you. Tilt the page if you want the colors to drift and blur even more, and add a touch of water if they aren’t blending.
Keep your brush loaded and keep moving. This wet-on-wet technique is forgiving by nature, so just keep the brush going.

Deepen the top and add a water reflection
For the top of the sky, reach for a bit of purple — from Tobio’s selection, Royal Plum and Twilight Indigo blend into a gorgeous violet. Don’t mix too many colors at once, or the sky can turn a muddy brown; blend just two at a time and they’ll stay clean and glowing. The closer you get to the top of the page, the darker you can go.
Painting a beach or lake scene? Add a reflection below the horizon line using the same colors in the same order — lightest near the horizon, deeper as you move down. Don’t make it exact; water is messy, and a loose reflection looks far more natural.

Add the foreground silhouette after it dries
Now for the hardest part: patience. Take a little coffee break and let the painting dry — yes, the exact opposite of how you started. Watercolor rewards letting each layer dry fully; keep working wet color over wet color and the paper suffers and the colors go dull. Trust me on this one.
Once it’s dry, paint the foreground. It can be trees, a little cabin, mountains, or a rooftop line — it doesn’t need much detail, just a clean silhouette against the bright sky. I like a dark but still-warm color like Forest Green, or you can go all the way to Ivory Black.
Easy variations
Once you’ve got the basic sky down, use the same wet-on-wet method to try a few twists:
- Mountains: swap the flat foreground silhouette for a strong mountain line.
- Beach: add a horizon reflection and a simple palm. My watercolor beach painting guide goes deeper into sand and water texture.
- Night instead of dusk: for cooler, moodier skies, my night sky tutorial walks through the exact steps.
- Coastal scenes with more detail: my seascape tutorial is the next step up once a basic sky feels comfortable.
Hungry for more? Browse our full collection of watercolor tutorials for your next painting.
Common mistakes
- Too much water. If your colors slide into a muddy grey instead of a clean gradient, the paper was probably too wet — or you added too many colors before the first ones settled. Too much water can also make the paper buckle. Less is more here.
- Muddy colors. It’s tempting to reach for all your beautiful colors at once, but stick to two or three touching each other at a time. Every extra color you mix on wet paper is a chance for the whole sky to turn brown.
- Adding the foreground too soon. Repeat after me: “I will let each layer dry fully before adding the next.” Watercolor doesn’t forgive an impatient brush — wait for the sky to dry.
Frequently Asked Questions
How do you paint a watercolor sunset for beginners?
Wet the paper, then start at the horizon. Use lighter, warmer colors closer to the horizon and work upward with deeper colors. Let it dry completely, then add a dark silhouette for the foreground.
What colors do you use for a watercolor sunset?
I love yellows and oranges near the horizon for that sunset glow, pinks and reds through the middle, and a deep plum or violet-blue at the top. From the Tobio’s kit, that’s Lemon Yellow, Sunset Orange, Poppy Bloom or Electric Rose, and Royal Plum with a touch of Twilight Indigo.
Do you paint a sunset wet-on-wet or wet-on-dry?
Wet-on-wet is best for the sky — it gives you those blended gradients instead of hard stripes of color. The foreground should be wet-on-dry, added only once the sky has dried completely.
How do you paint a sunset sky gradient?
Wet the whole sky with clean water, then add your colors one at a time and let them bloom and bleed into each other. Tilt the paper if you want them to mix more, and resist piling too many colors on top of each other.
What do you paint after the sunset dries?
The foreground can be all sorts of things, but I love trees (pines or palms), mountains, a lake, or a little cabin. Anything that reads as a dark silhouette against a gradient sky looks magical.
Go paint the sky you’re looking at right now
Ready to give it a try? Go grab your kit and paint the sky outside right now — or pull up a photo and paint from that.
If you don’t have your materials yet, the Tobio’s Watercolor Kit is the perfect place to start: the walnut palette, the paint, the paper and the brush, all in one pocket-sized box. Happy painting.
Mel, FounderMore watercolor tutorials
Ready to paint your first sunset?
Everything you need in one beginner-friendly kit: student-grade pigments, a water brush, quality cotton watercolor paper, and a pocket-sized walnut palette.
Get the Tobio’s Watercolor Kit


